Introduction
Every project manager knows the sinking feeling; You're halfway through a project, confident that everything is on track. Then the monthly financial report arrives, and reality hits—you've blown past your budget by 30%. Materials cost more than expected. Hours logged by contractors exceeded estimates. And somehow, no one raised a flag until it was too late.
This scenario is painfully common. According to project management research, only 40% of projects finish within budget. The primary culprit? A lack of real-time visibility into project expenses. Traditional accounting systems report on costs weeks after they occur, turning budget management into a guessing game.
Odoo 19 solves this problem through its robust Analytic Budgets and Project Profitability dashboards. Instead of waiting for month-end reports, project managers can track expenses as they happen—watching "Committed" and "Achieved" costs in real time, against approved budgets.
This article provides a comprehensive guide to setting up and using Odoo 19's real-time project expense tracking, from initial configuration to advanced monitoring techniques.
Why Real-Time Expense Tracking Matters
Before diving into the "how," it's worth understanding the "why." Real-time expense tracking delivers several critical advantages:
Early Warning, Not Post-Mortem – Traditional budget tracking tells you what went wrong. Real-time tracking tells you what is going wrong, while you still have time to correct course.
Better Decision Making – When you can see remaining budget instantly, you make better decisions about scope changes, resource allocation, and vendor negotiations.
Improved Accountability – Team members who know expenses are being tracked in real time are more conscious of their spending decisions.
Faster Client Billing – When expenses are tracked against project codes from the moment they occur, client billing becomes faster and more accurate.
Reduced Administrative Overhead – Automated tracking eliminates hours of manual reconciliation between accounting spreadsheets and project management tools.
Phase 1: Configuration and Setup
Before Odoo 19 can track project budgets, you must enable the necessary features. This is a one-time configuration step that unlocks the entire analytic accounting framework.
Step 1: Enable Budget Management
The first step is activating the analytic accounting and budget management features in Odoo 19.
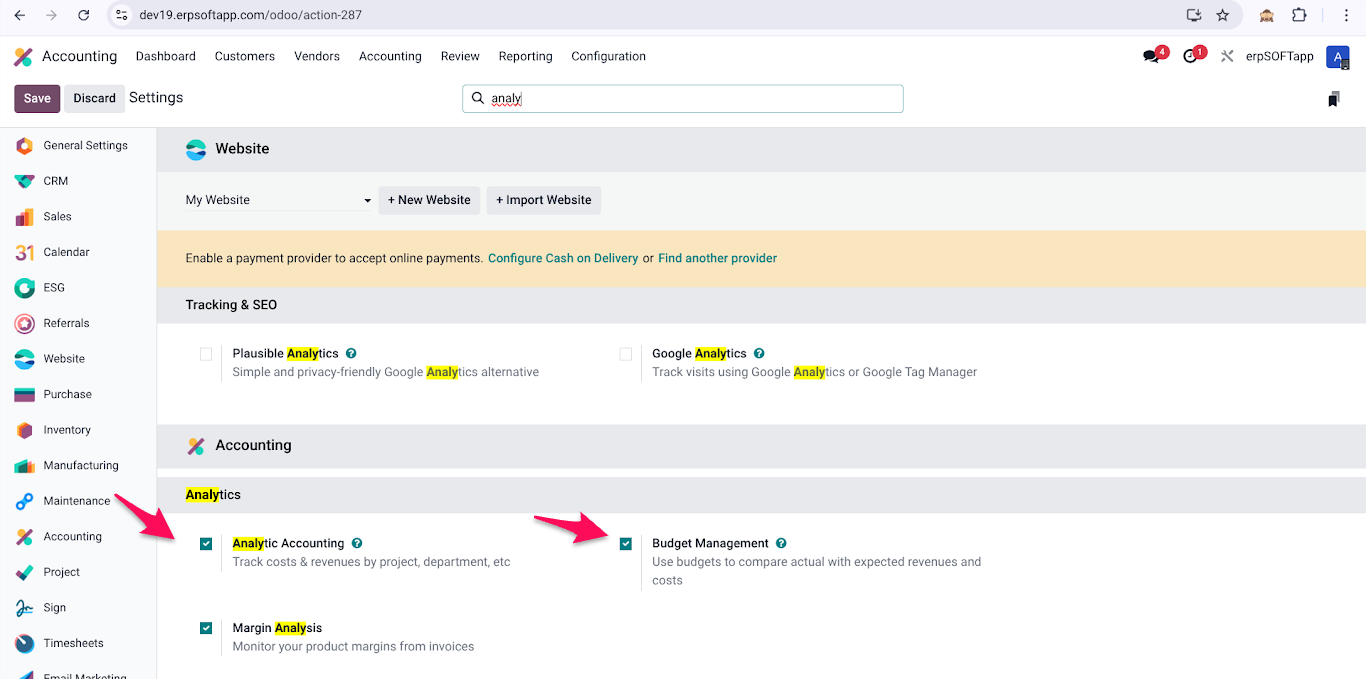
Navigation Path: Accounting → Configuration → Settings
Once in the Settings screen, scroll down to the Analytics section. Here you will find two critical checkboxes:
- Analytic Accounting – This enables the foundational system for tracking costs and revenues by specific projects, departments, or any other dimension you define.
- Budget Management – This activates the ability to set approved budgets and compare them against actual spending.
Both boxes must be checked – Analytic Accounting is the engine; Budget Management is the dashboard. Without both, real-time budget tracking cannot function.
After checking both boxes, click Save – Odoo may require a page refresh or a server restart for these changes to take effect, depending on your hosting environment.
Step 2: Configure Analytic Plans and Accounts
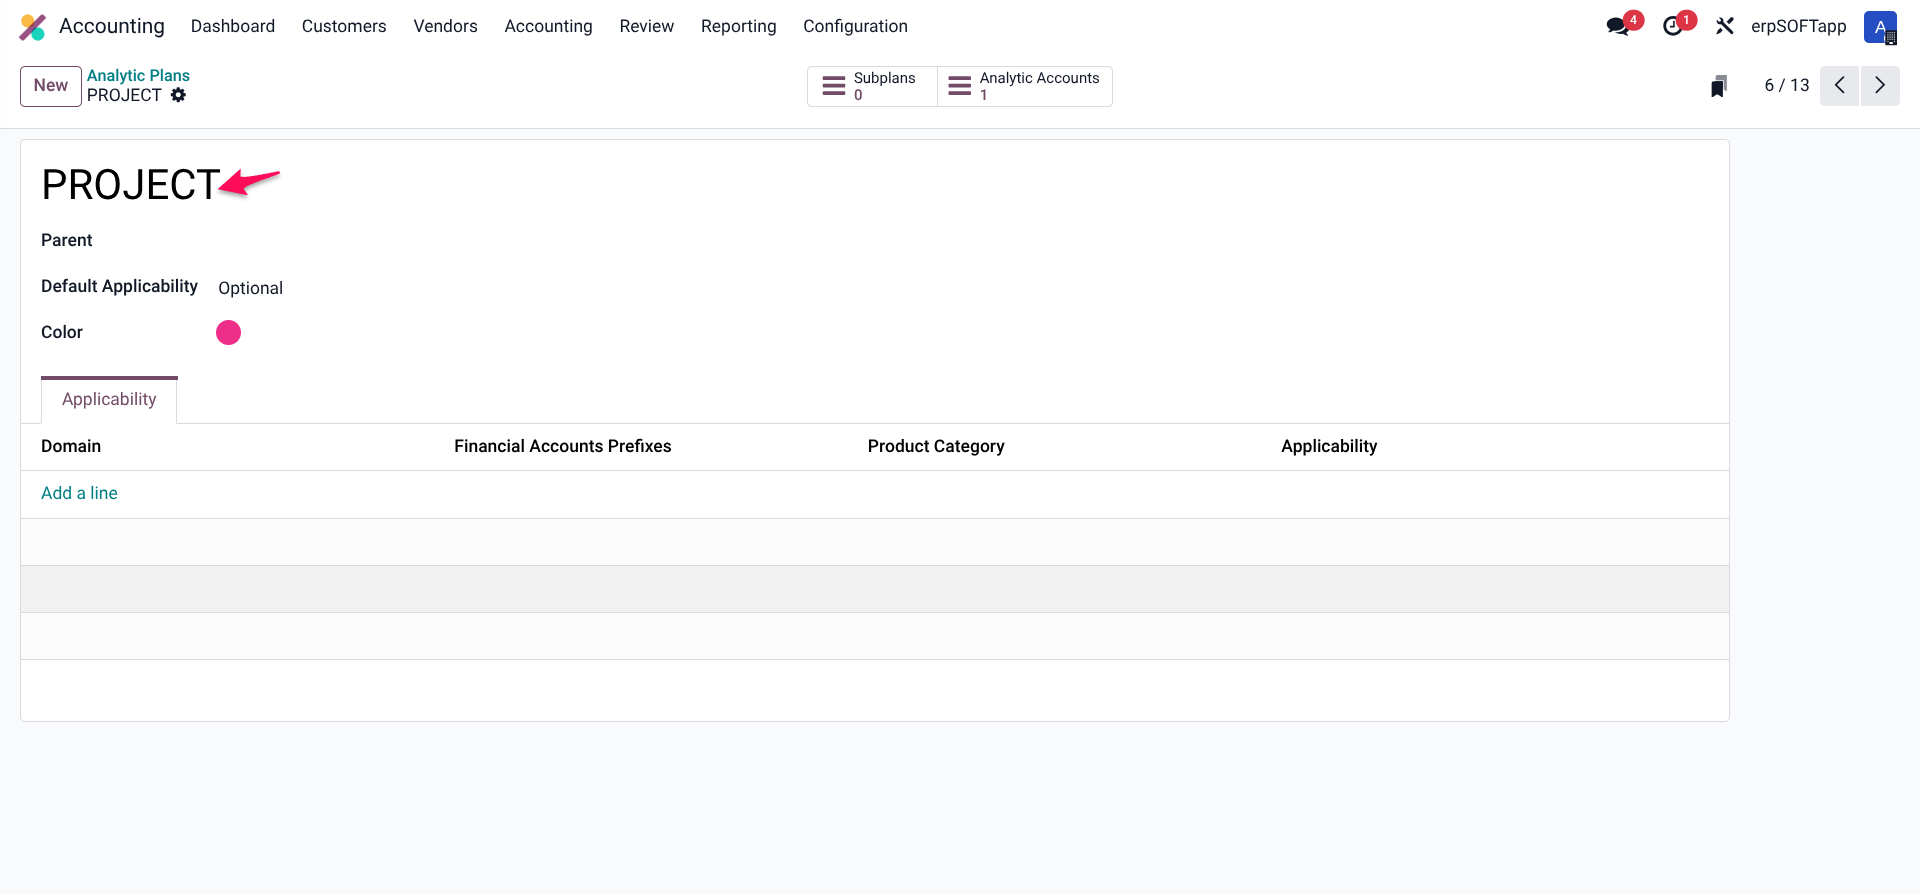
Analytic plans are the organising framework for your analytic accounts. Think of an Analytic Plan as a category (e.g., "Projects," "Departments," "Product Lines") and an Analytic Account as a specific instance within that category (e.g., "Project Alpha," "Marketing Department").
The system already comes with a default Project analytic plan. It is important to use this Project analytic plan because it acts as a bridge that connects project budgets in the accounting module with active projects in the project module.
Navigation Path: Accounting → Configuration → Analytic Plans
Since you already have a default Project Analytic Plan, you need to create individual analytic accounts for each project that will track expenses.
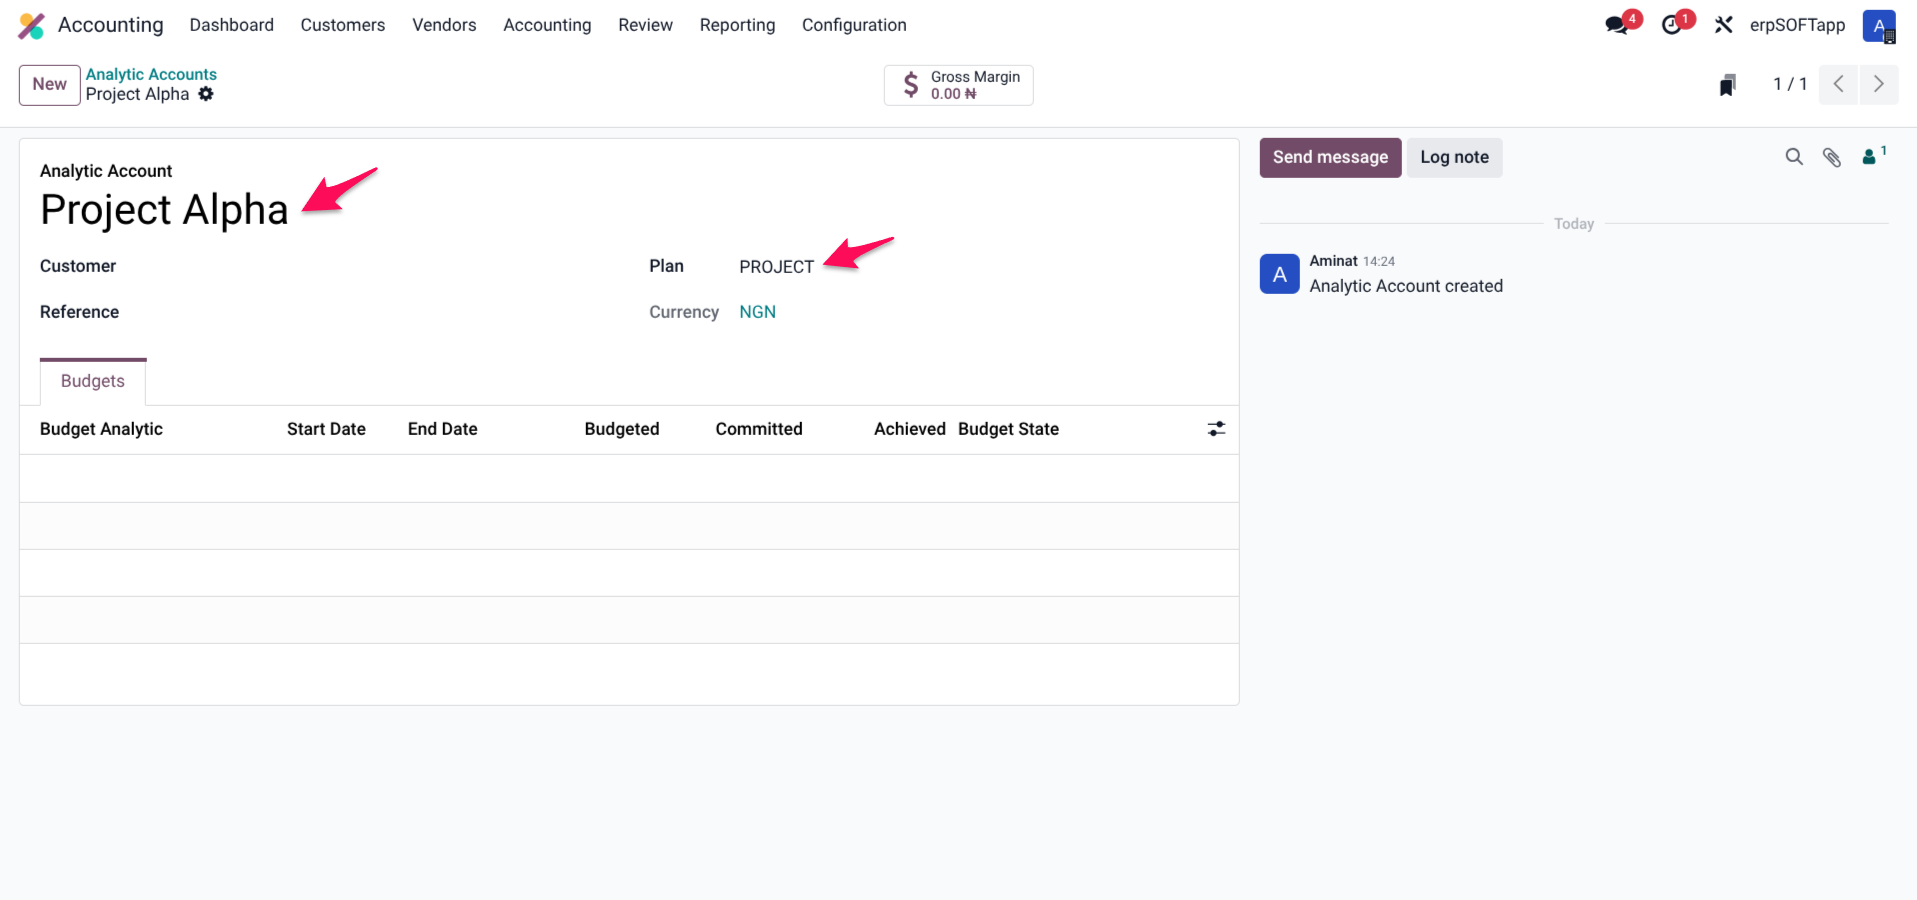
Navigation Path: Accounting → Configuration → Analytic Accounts
To create a new Analytic Account:
1. Click New
2. Enter a name that matches your project (e.g., "Project Alpha - Q2 2026")
3. Under Plan, select the Project Analytic Plan
4. Optionally, add a code or reference number for easier searching
5. Add a description that clarifies the project's scope or client
6. Click Save
Pro Tip: Create analytic accounts before you start your project. This allows all project-related expenses to be tagged correctly from the very first vendor bill or purchase order.
Step 3: Link Analytic Accounts to Projects
For seamless tracking, you should link your analytic accounts directly to your Odoo projects. This creates a tighter integration between the Project and Accounting modules.
Navigation Path: Project → Projects → Select Your Project → Edit
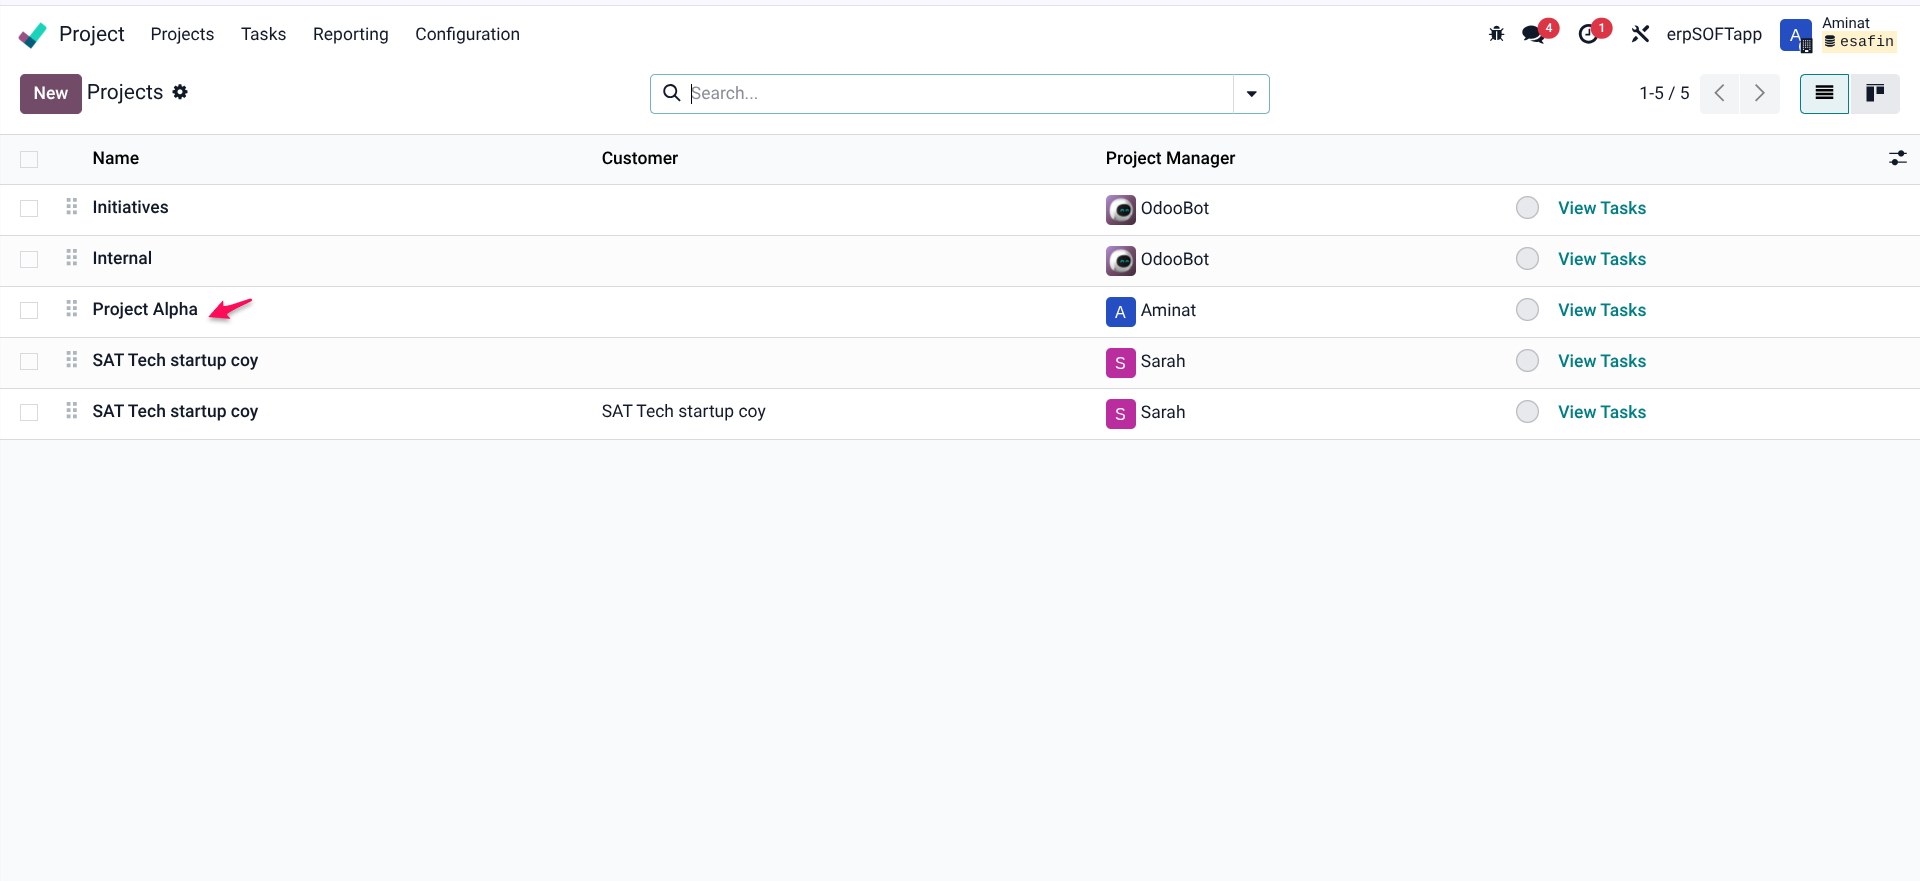
Within the project configuration form, look for the Analytic Account field (usually found in the Accounting or Settings tab). Select the analytic account you created for this project.

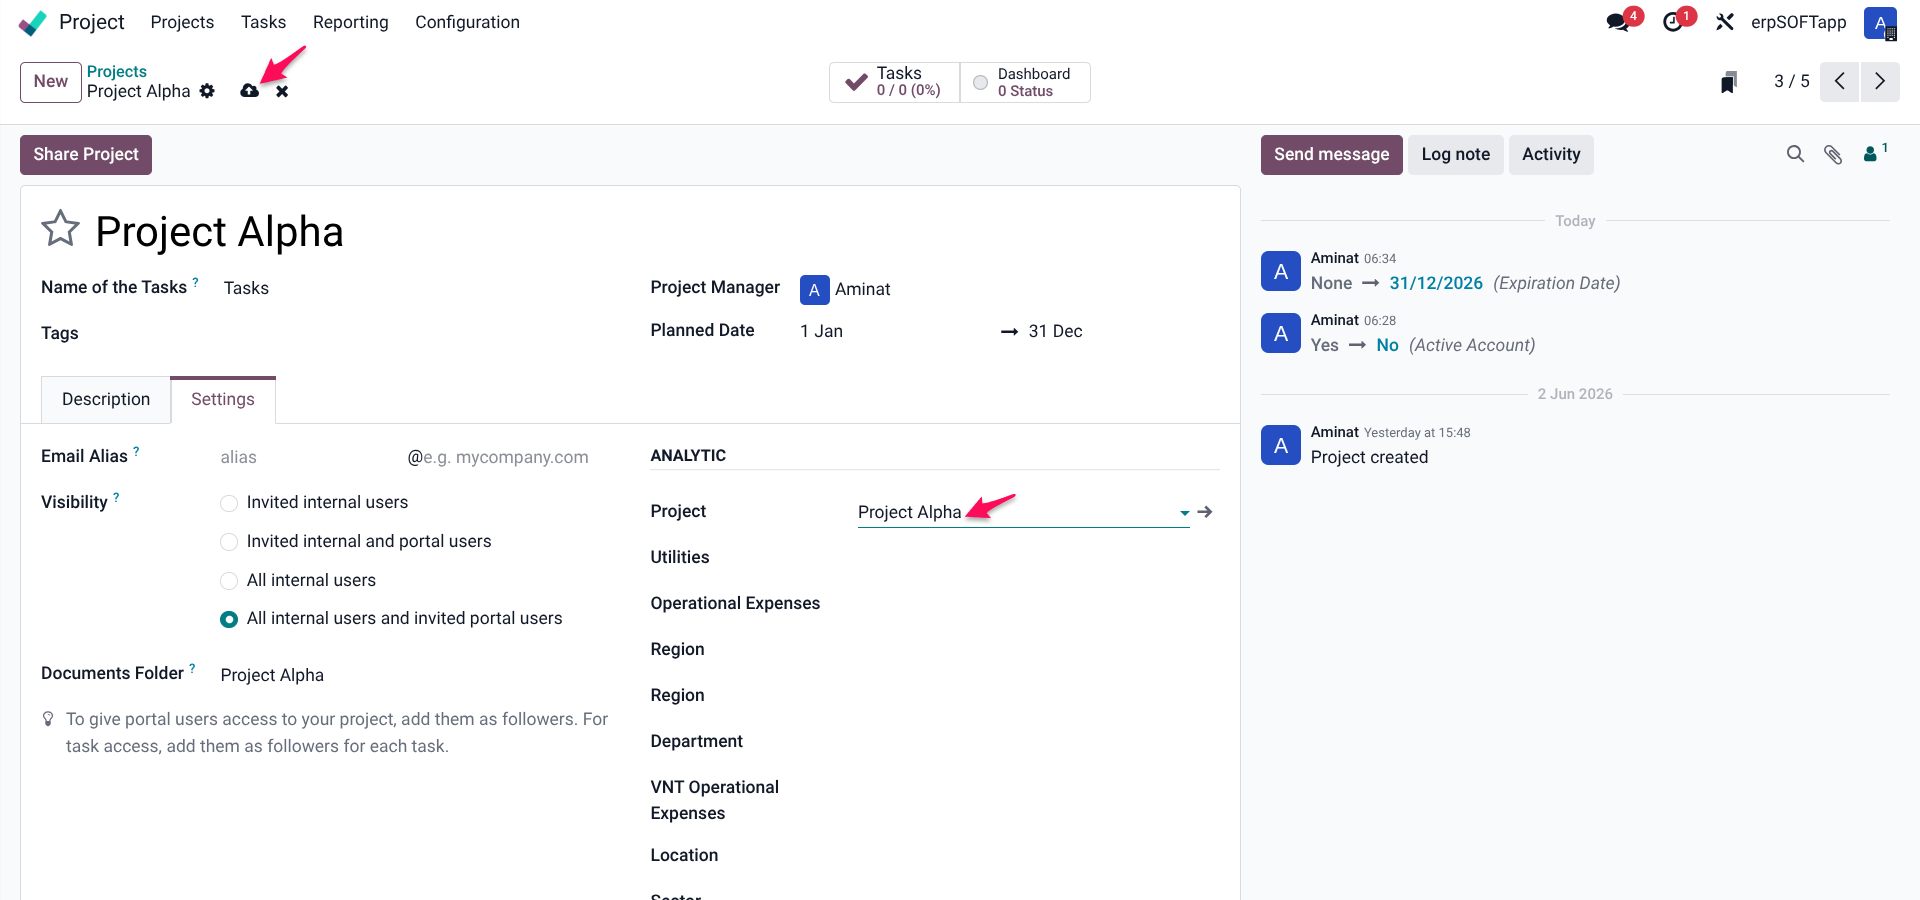
Once linked, all expenses recorded directly within the Project module—such as timesheets or material costs—will automatically be associated with the correct analytic account.
Phase 2: Setting Up the Approved Budget
With the infrastructure in place, you can now define the approved budget for your project. This is the "baseline" against which all actual spending will be compared.
Step 1: Create an Analytic Budget
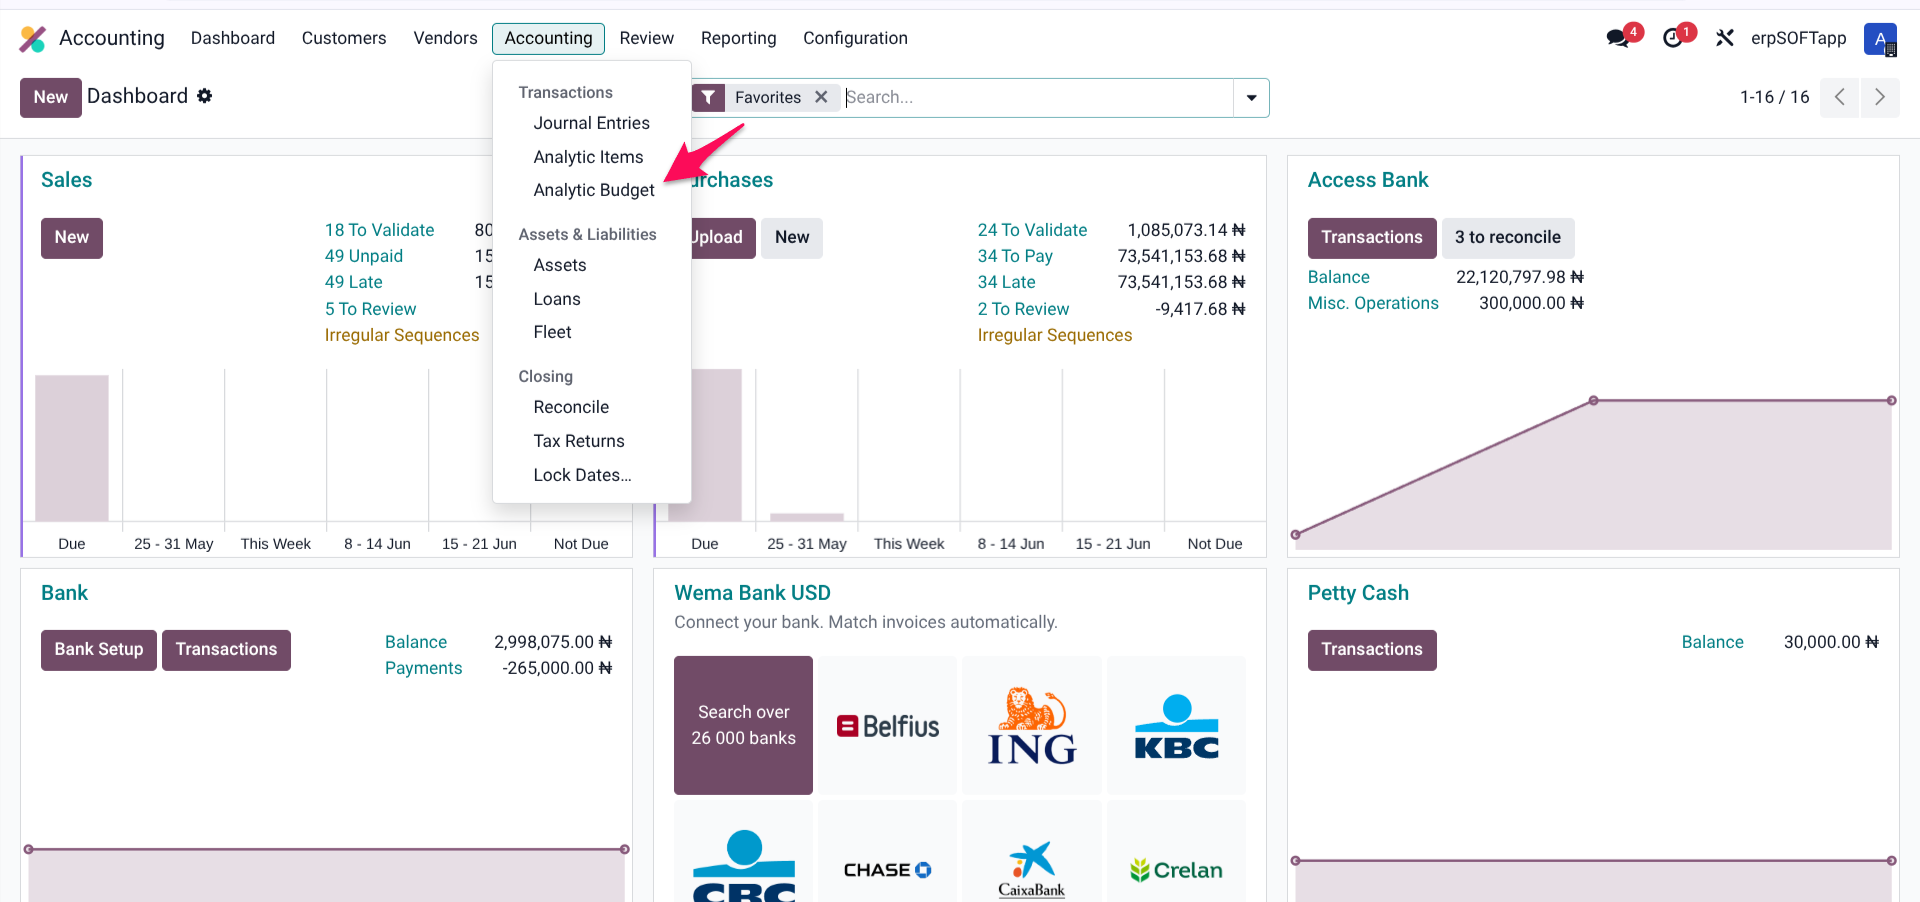
Navigation Path: Accounting → Accounting → Analytic Budgets
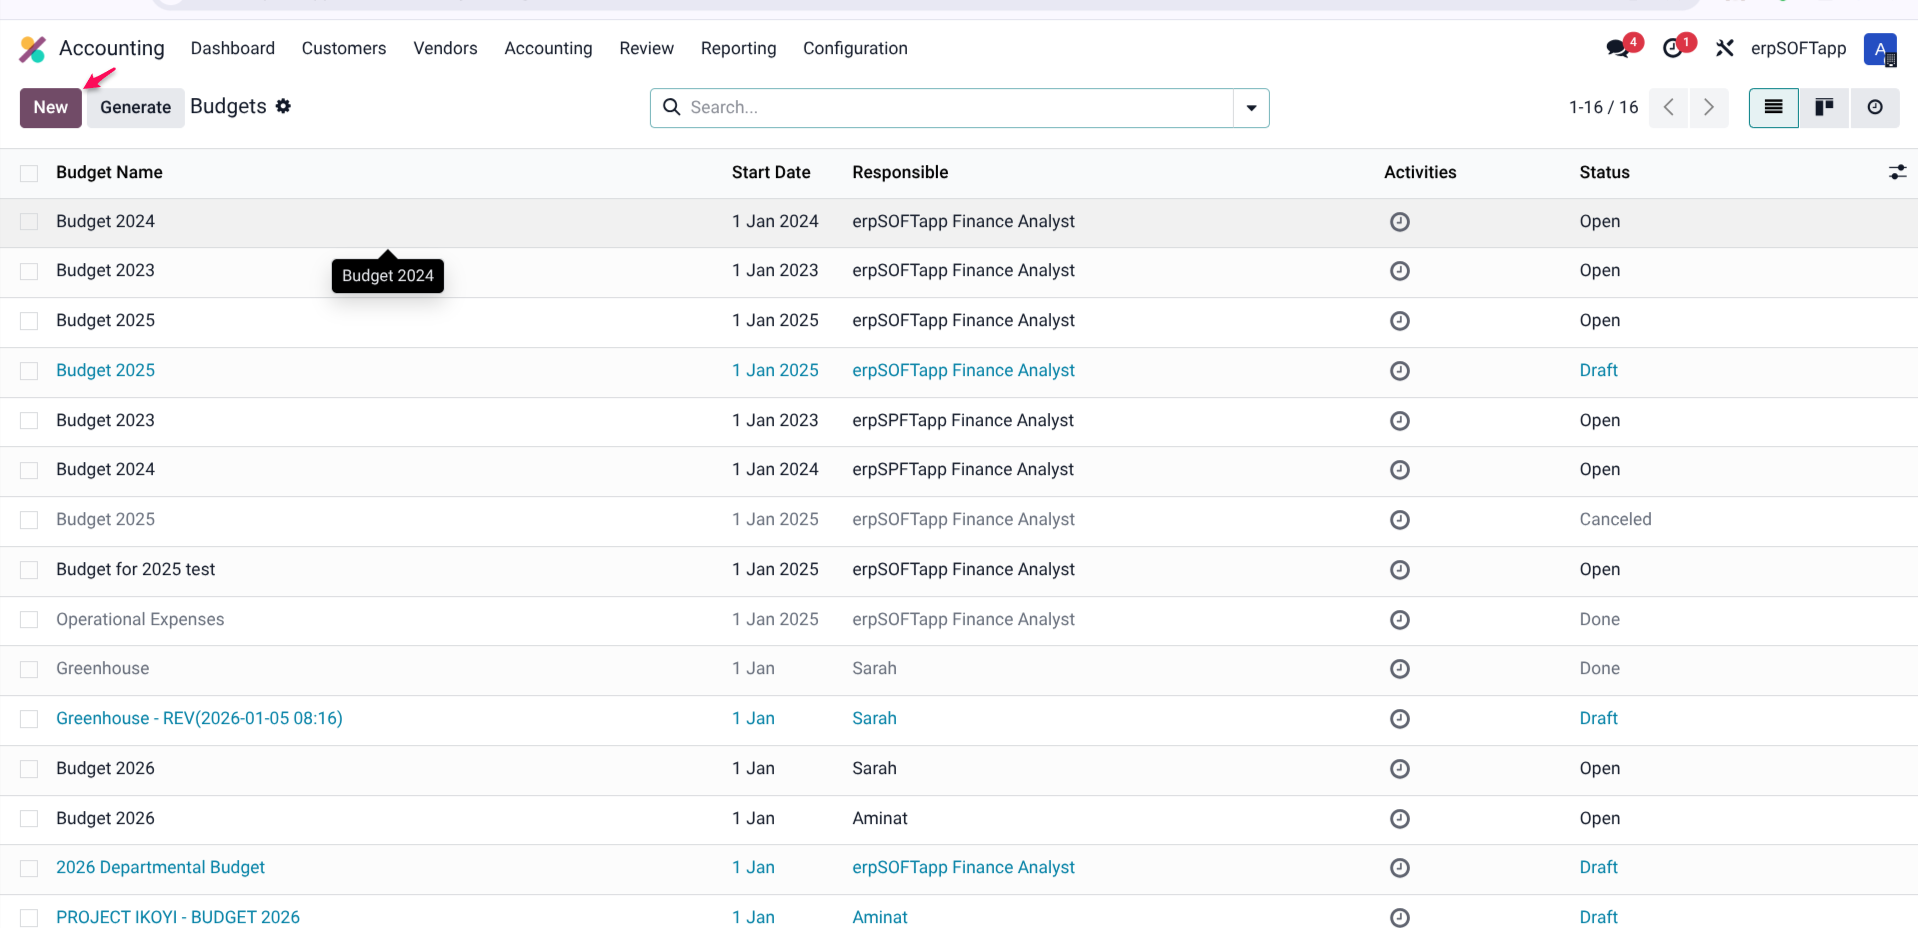
To create a new budget:
1. Click New
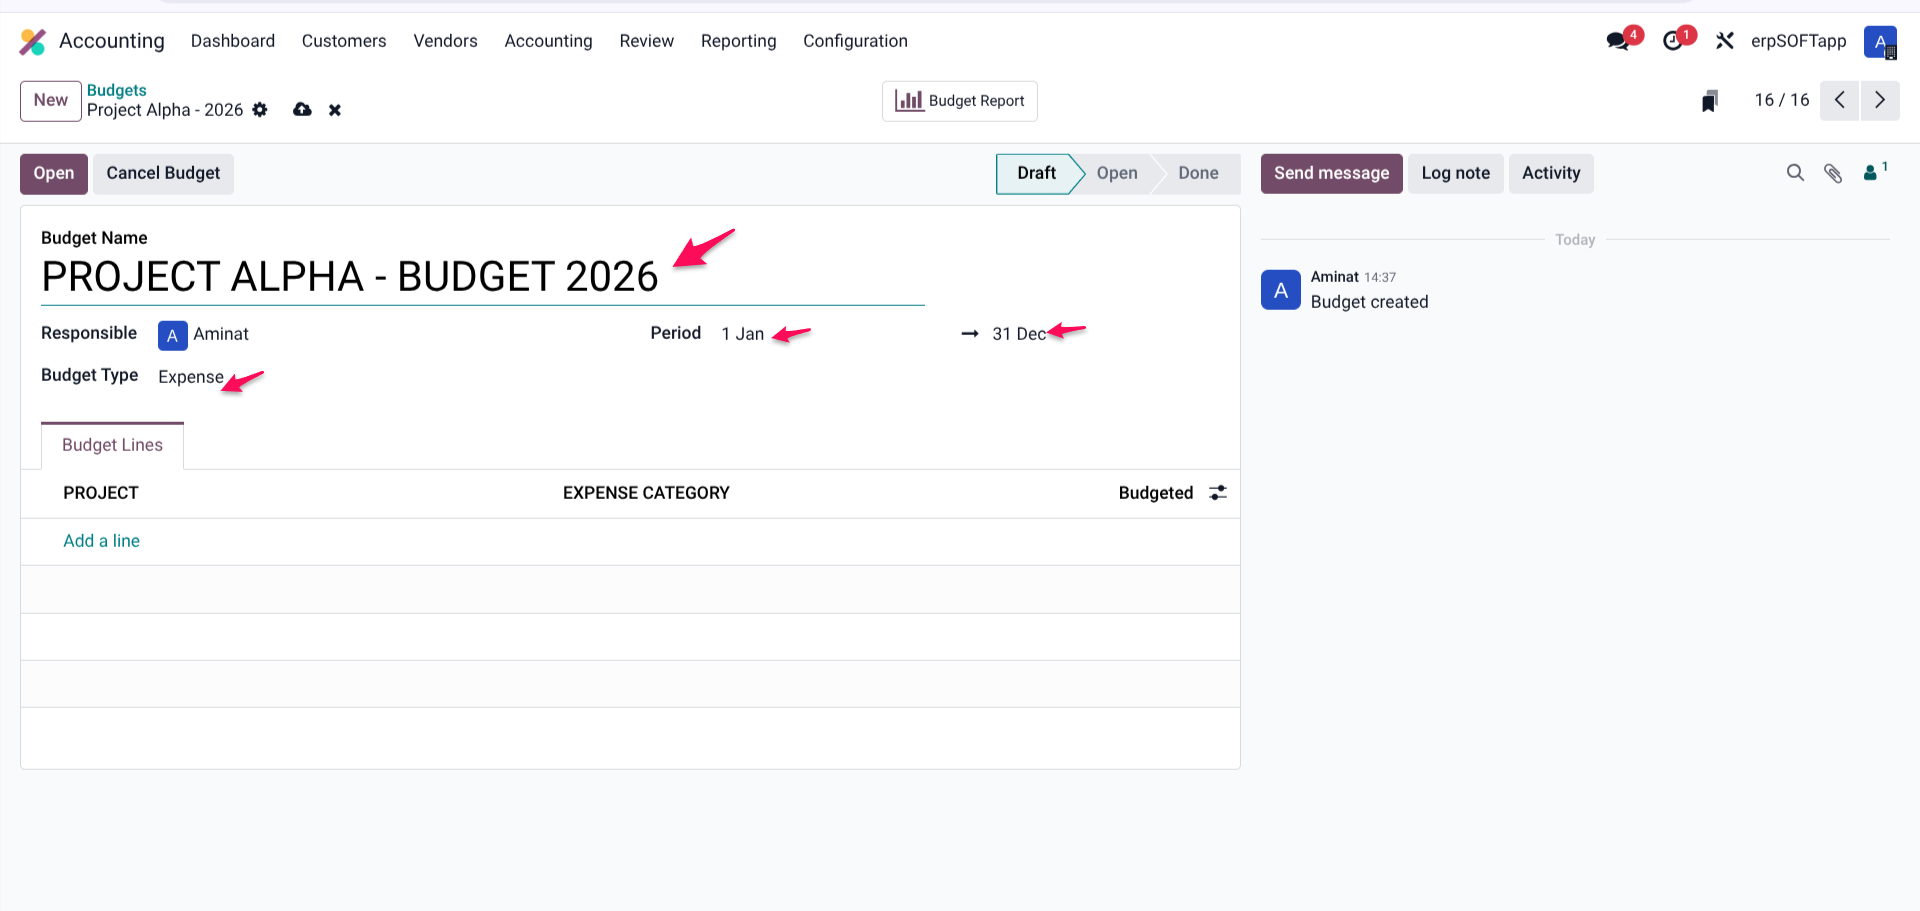
2. Budget Name: Give it a descriptive, searchable name. Best practice includes the project name and period, such as "Project Alpha - Q2 2026 Budget" or "Website Redesign - FY2026."
3. Company: If you operate multiple companies, select the correct one.
4. Period: Define the start and end dates for this budget. This period should align with your project timeline. For ongoing projects, consider quarterly budgets rather than annual ones for tighter control.
5. Budget Type: Select "Expense" for a spending budget. (Revenue-focused budgets would use "Revenue" or "Revenue and Expense.")
Click Save to create the budget shell. At this stage, the budget exists but contains no line items.
Step 2: Define Budget Lines
The heart of budget tracking lies in the Budget Lines. Each line associates a specific analytic account with a budgeted amount.
Within the Analytic Budget form, navigate to the Budget Lines tab and click Add a line.
For each line, you will need to specify:
Field | Description | Example |
Analytic Plan | The category of accounts | Projects |
Analytic Account | The specific project | Project Alpha |
Budgeted | The approved spending limit for this project | $50,000 |
Multiple Budget Lines: A single budget can contain multiple lines. This is useful if you manage multiple projects under one budget document or if you want different spending limits for different phases of the same project.
Example: A marketing campaign budget might include three lines:
- Creative Development (Analytic Account: MKG-CREATIVE) – Budgeted: $10,000
- Media Buying (Analytic Account: MKG-MEDIA) – Budgeted: $25,000
- Event Sponsorship (Analytic Account: MKG-EVENTS) – Budgeted: $15,000
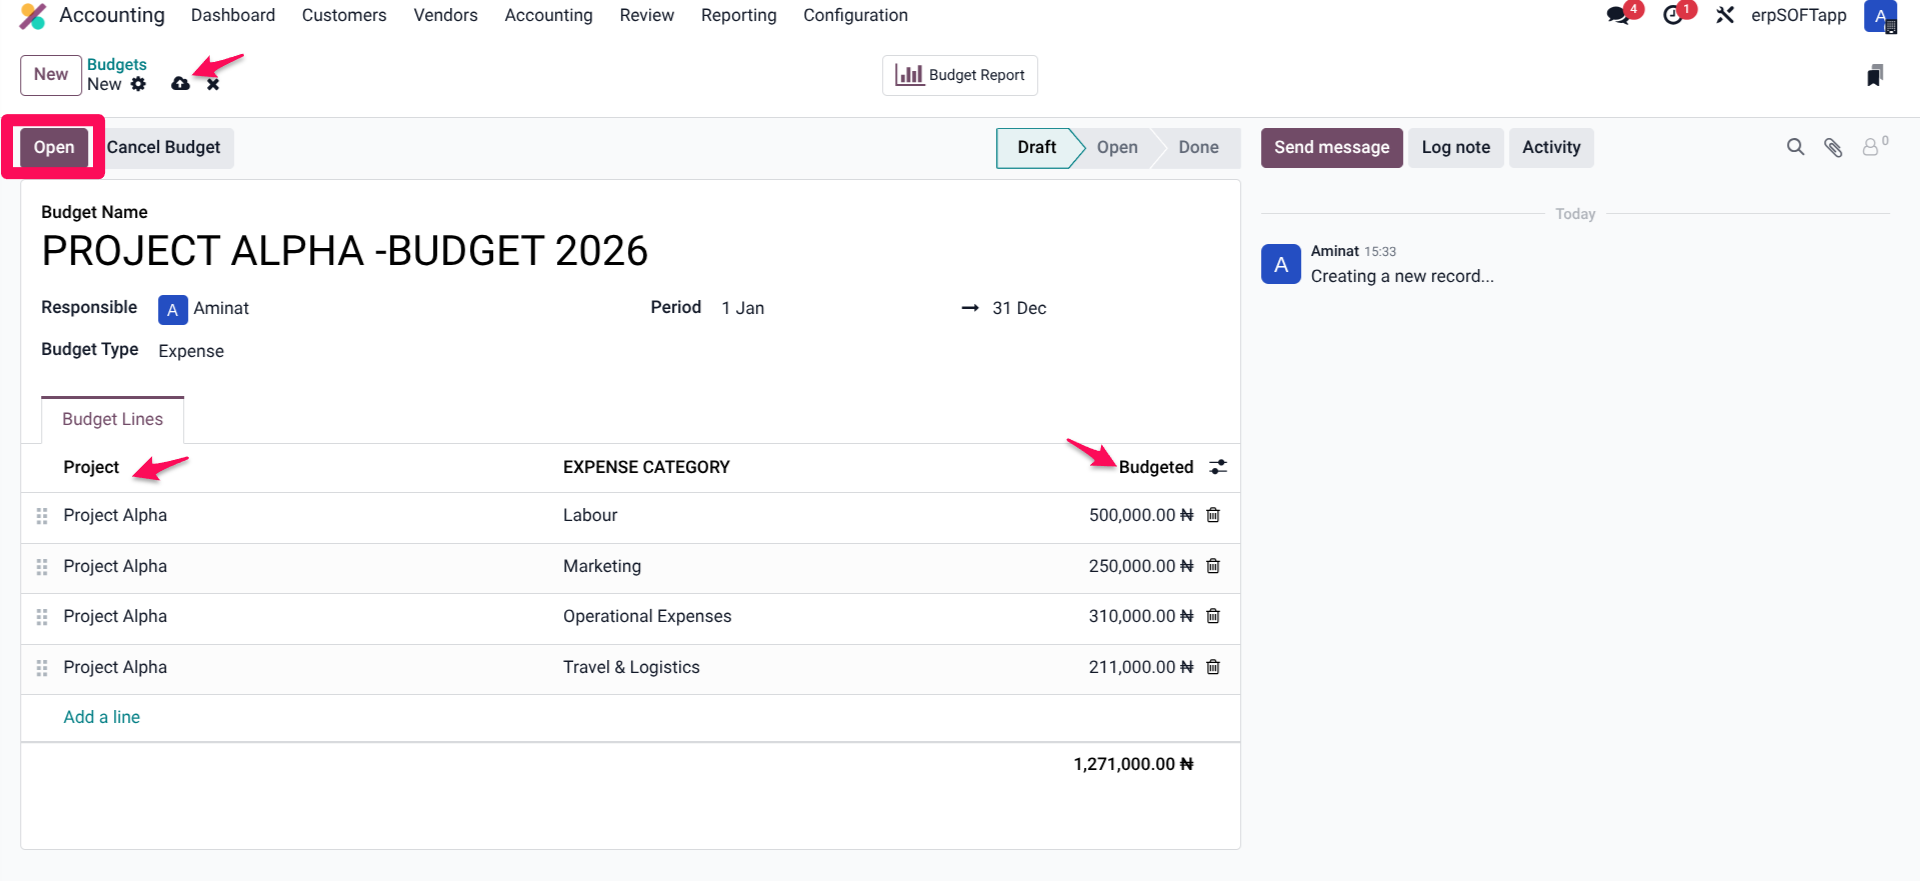
Step 3: Activate the Budget
Once your budget lines are defined and amounts entered, you must activate the budget for tracking to begin.
Click the Open button. This changes the budget status from "Draft" to "Open." Only open budgets contribute to the Committed and Achieved calculations.
Important: You cannot edit an open budget's lines without first resetting it to draft. Always double-check your budgeted amounts before clicking Open.
Phase 3: Real-Time Expense Tracking
With configuration complete and the budget open, Odoo 19 automatically begins tracking expenses in real time. The system records costs whenever a transaction is linked to your project's analytic account.
How Expenses Are Captured
Odoo 19 tracks project expenses through three primary channels. In each case, the critical step is ensuring the expense is linked to the correct Analytic Account.
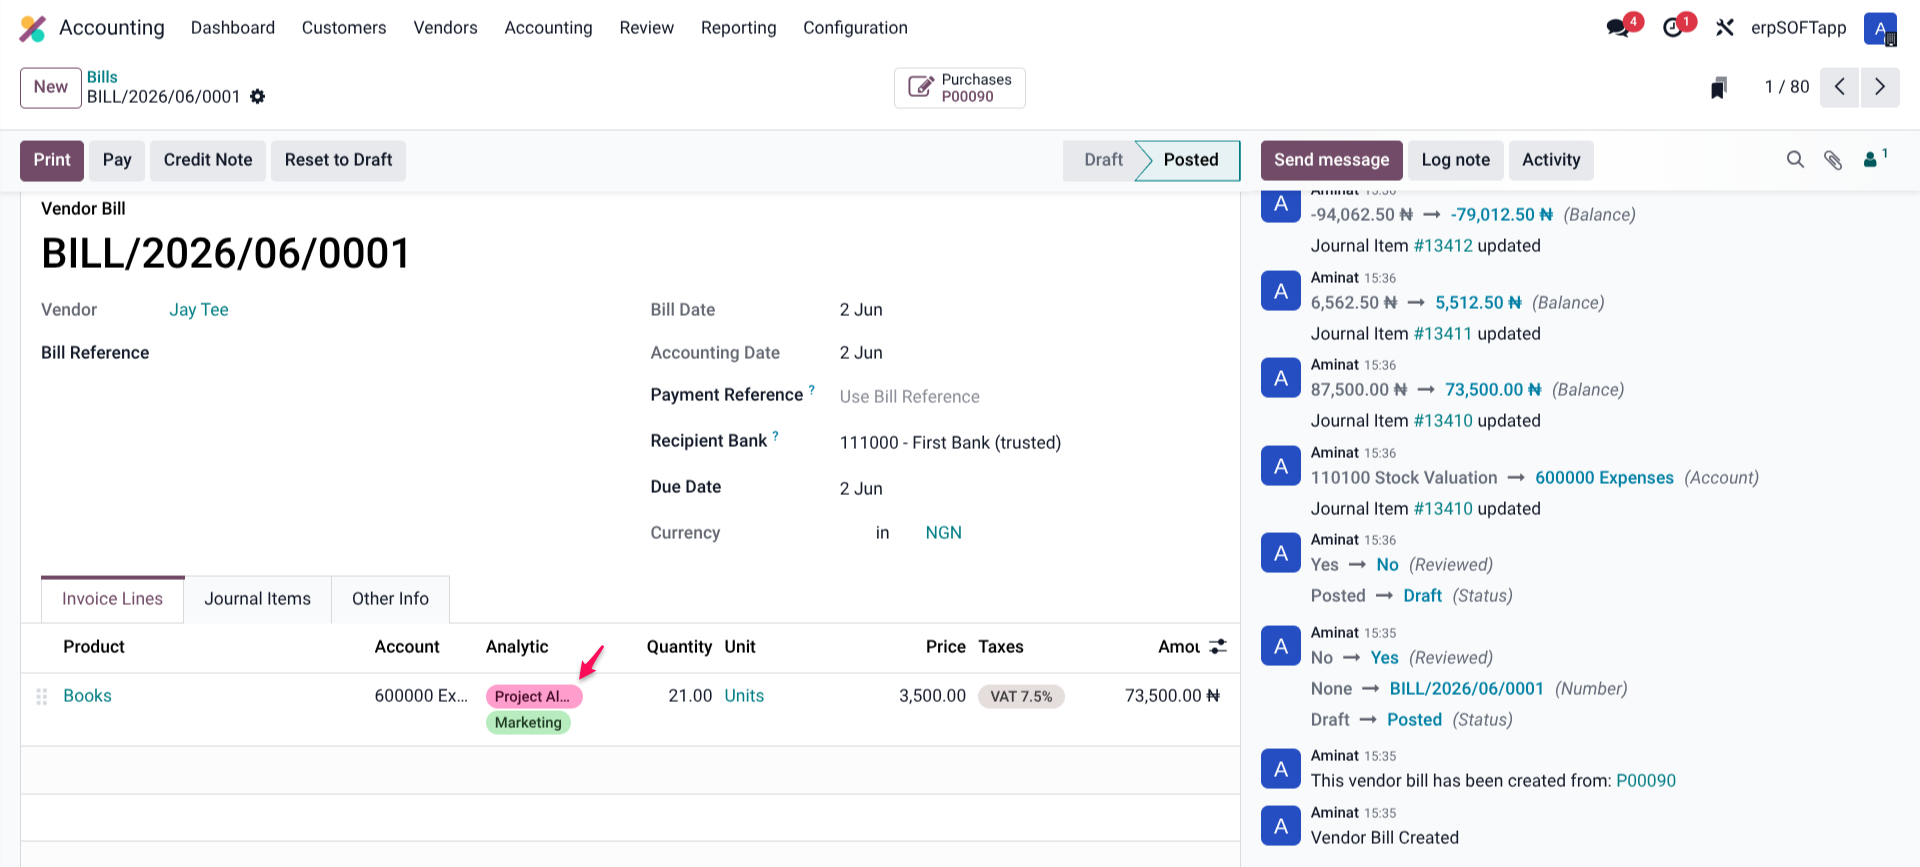
Channel 1: Vendor Bills (Accounts Payable)
When your accounts payable team processes a vendor bill related to your project, they must tag it correctly.
Navigation Path: Accounting → Vendors → Bills → Create Bill
On each invoice line, look for the Analytic Account column. Select the analytic account associated with your project.
Example: Your development agency sends a monthly retainer invoice for $5,000 related to Project Alpha. The accounts payable clerk adds a line for $5,000, selects the "Project Alpha" analytic account, and validates the bill. Within seconds, the Project Profitability dashboard for Project Alpha reflects a $5,000 Achieved expense.
Channel 2: Employee Expenses (Expense App)
Employee-submitted expenses—travel, meals, software subscriptions, office supplies—can all be tracked to specific projects.
Navigation Path: Expenses → My Expenses → Submit Expense
When an employee creates an expense report, they must select the Analytic Account field before submitting for approval. This ensures that approved expenses flow directly to the correct project budget.
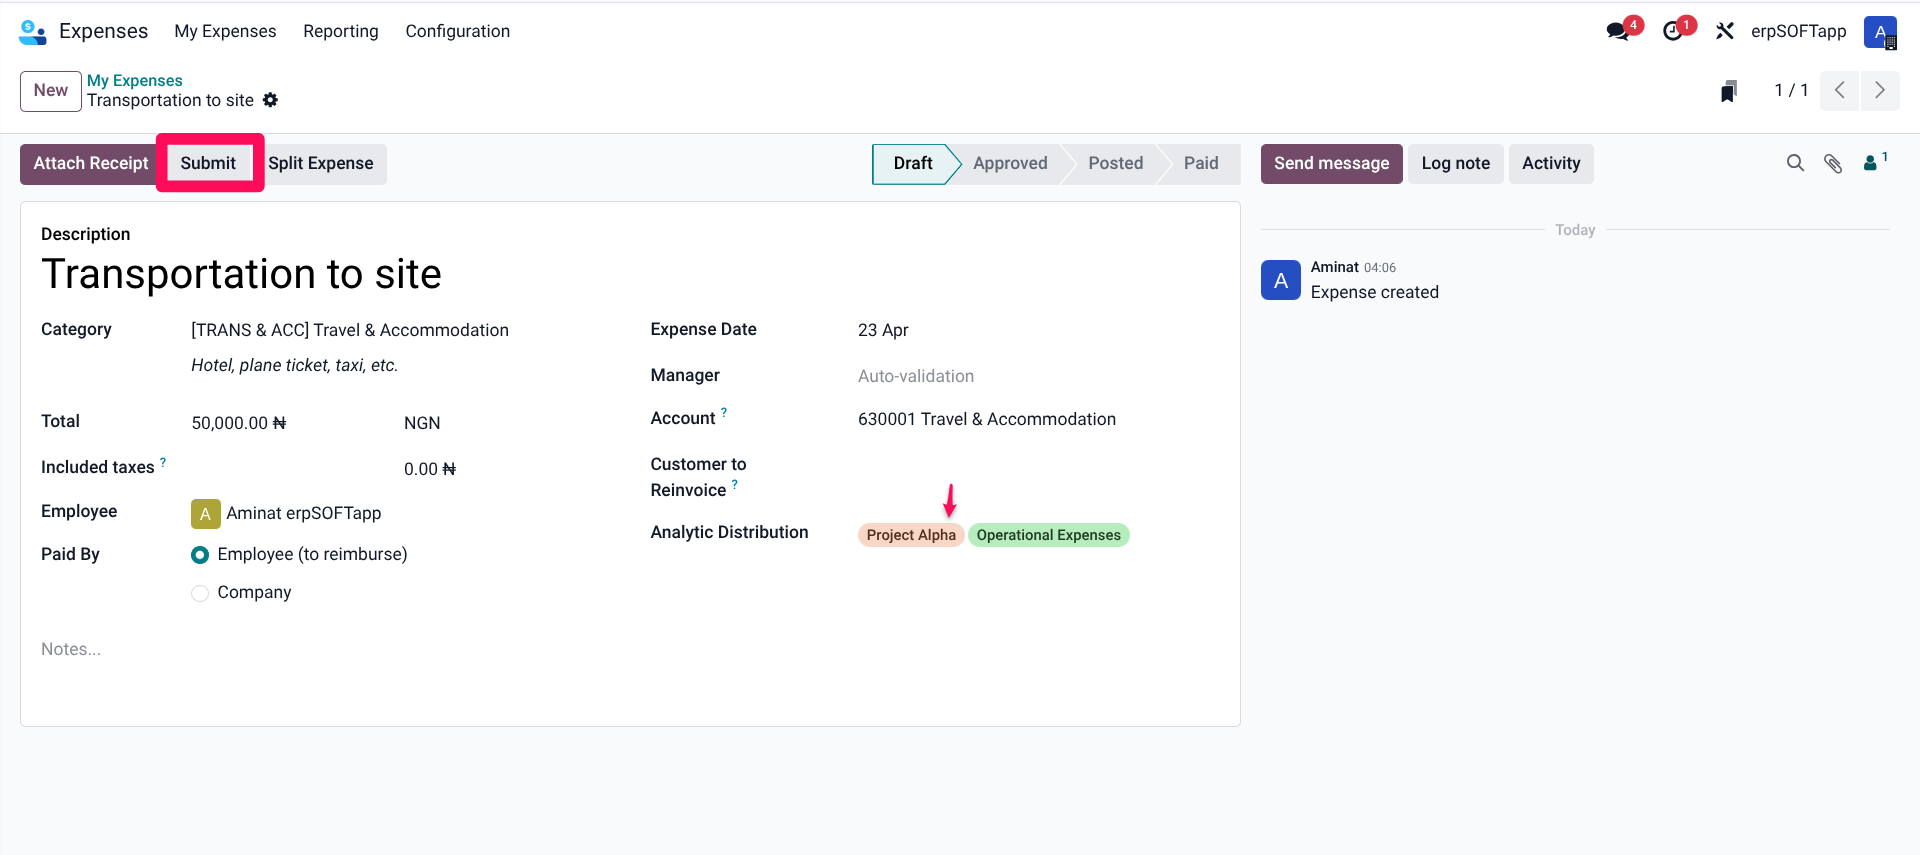
Best Practice: Train your team to always select a project analytic account when submitting expenses. Make this a required field in your expense approval workflow.
Channel 3: Purchase Orders
Purchase Orders represent future commitments rather than actual expenses. Odoo 19 handles these specially through the Committed column.
Navigation Path: Purchase → Orders → Request for Quotation → Create PO
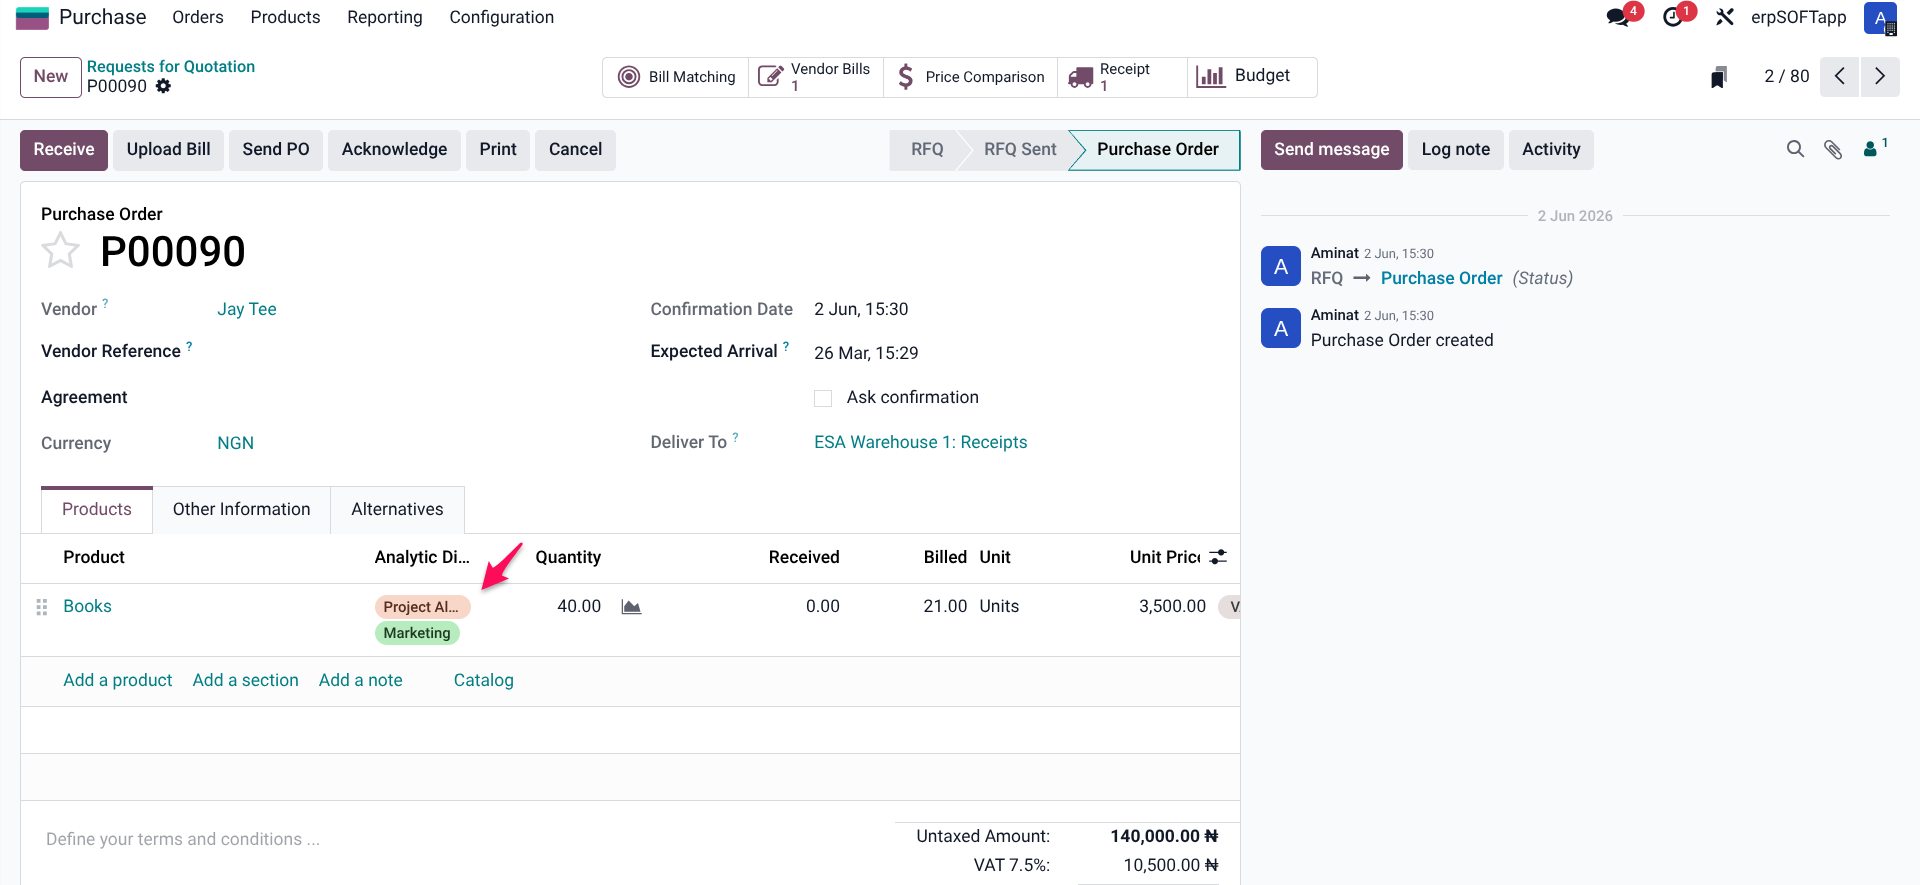
When creating a purchase order, link each line item to the project's analytic account. Once the purchase order is confirmed, the amount appears in the Committed column—not yet an actual expense, but recognised as a commitment against the budget.
Why This Matters: Committed amounts give project managers a "worst-case" view of remaining budget. If you have a $50,000 budget, $40,000 in actual expenses (Achieved), and $15,000 in open purchase orders (Committed), you know you are effectively $5,000 overcommitted, even though only $40,000 has been paid.
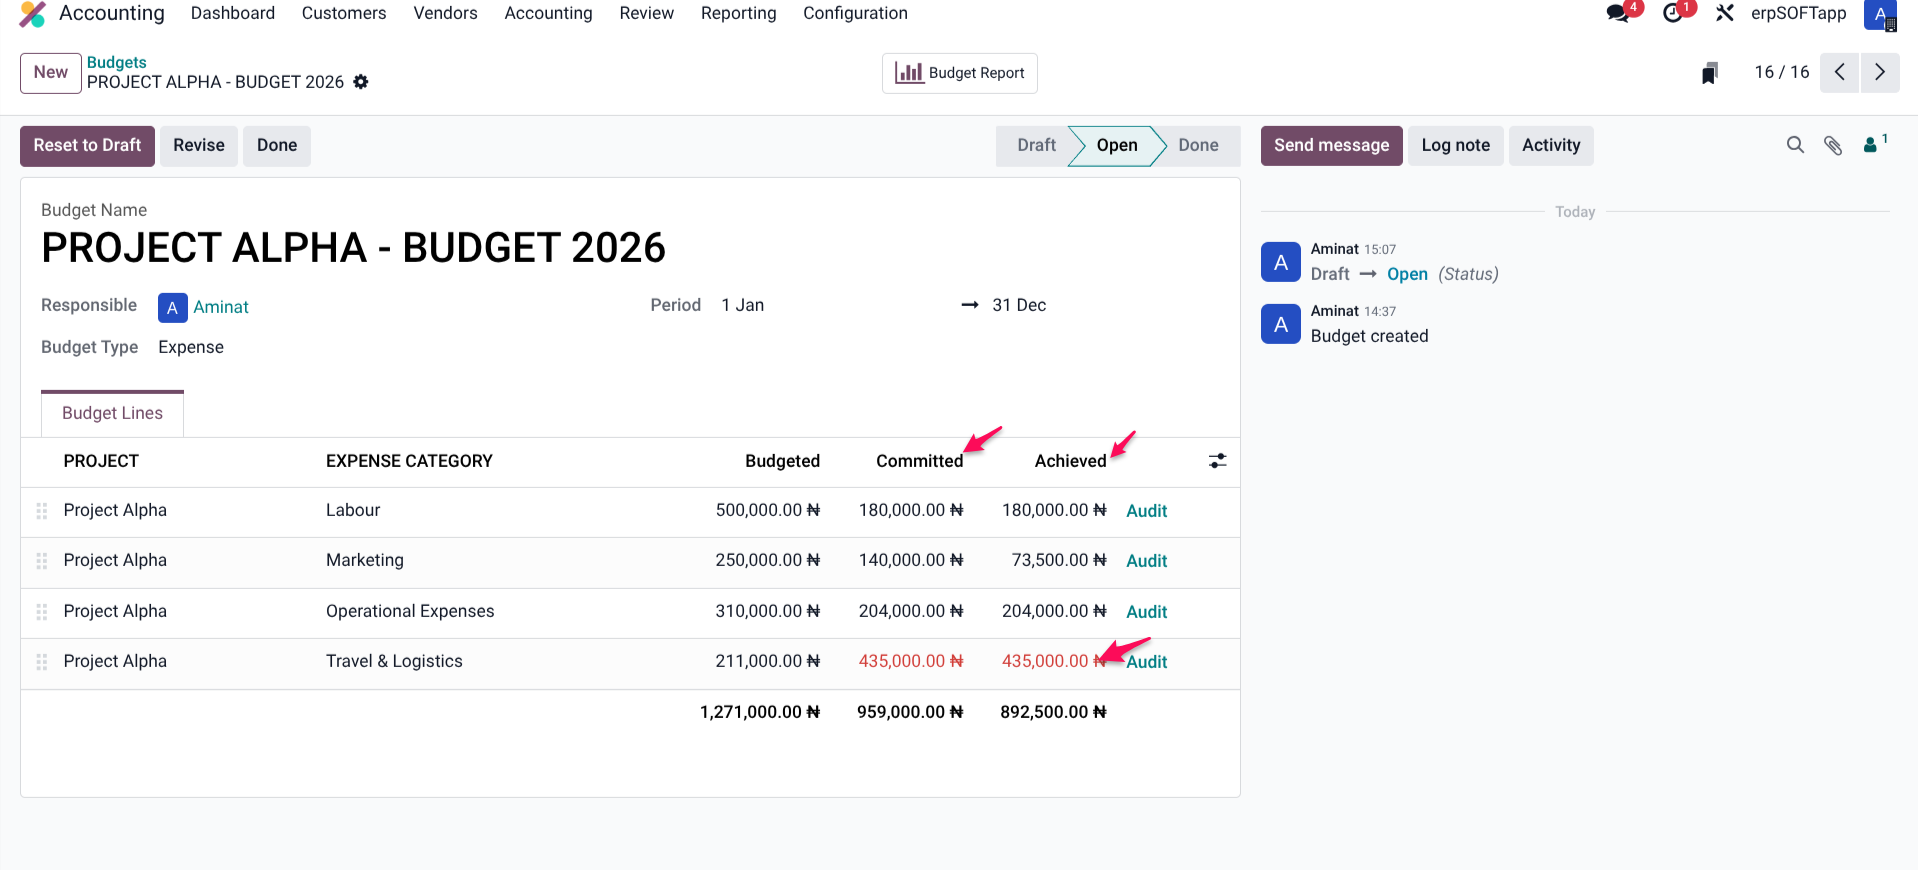
Real-Time Monitoring: The Budget View
Once your budget is Open and expenses begin flowing, the magic of Odoo 19 becomes visible. Return to your Analytic Budget (Accounting → Accounting → Analytic Budgets → Select your budget).
The budget form displays two critical columns for each budget line:
Column | Definition | What It Tells You |
Committed | Achieved costs + confirmed Purchase Orders not yet billed | Your "worst-case" spending position. If this exceeds Budgeted, you are overcommitted. |
Achieved | Actual costs from posted vendor bills and approved expenses | What you have actually paid so far. |
Budgeted | Your approved spending limit | The baseline you set during setup. |
Remaining (Calculated) | Budgeted - Achieved (or Budgeted - Committed, depending on your view) | How much room you have left. |
Real-Time Example:
Your Project Alpha has a Budgeted amount of $50,000.
The system shows:
- Achieved: $32,000 (actual vendor bills and approved expenses)
- Committed: $45,000 ($32,000 Achieved + $13,000 in open Purchase Orders)
Despite having only $32,000 in actual spending, your Committed amount of $45,000 signals that you have only $5,000 of "safe" budget remaining before you exceed the limit—a critical early warning.
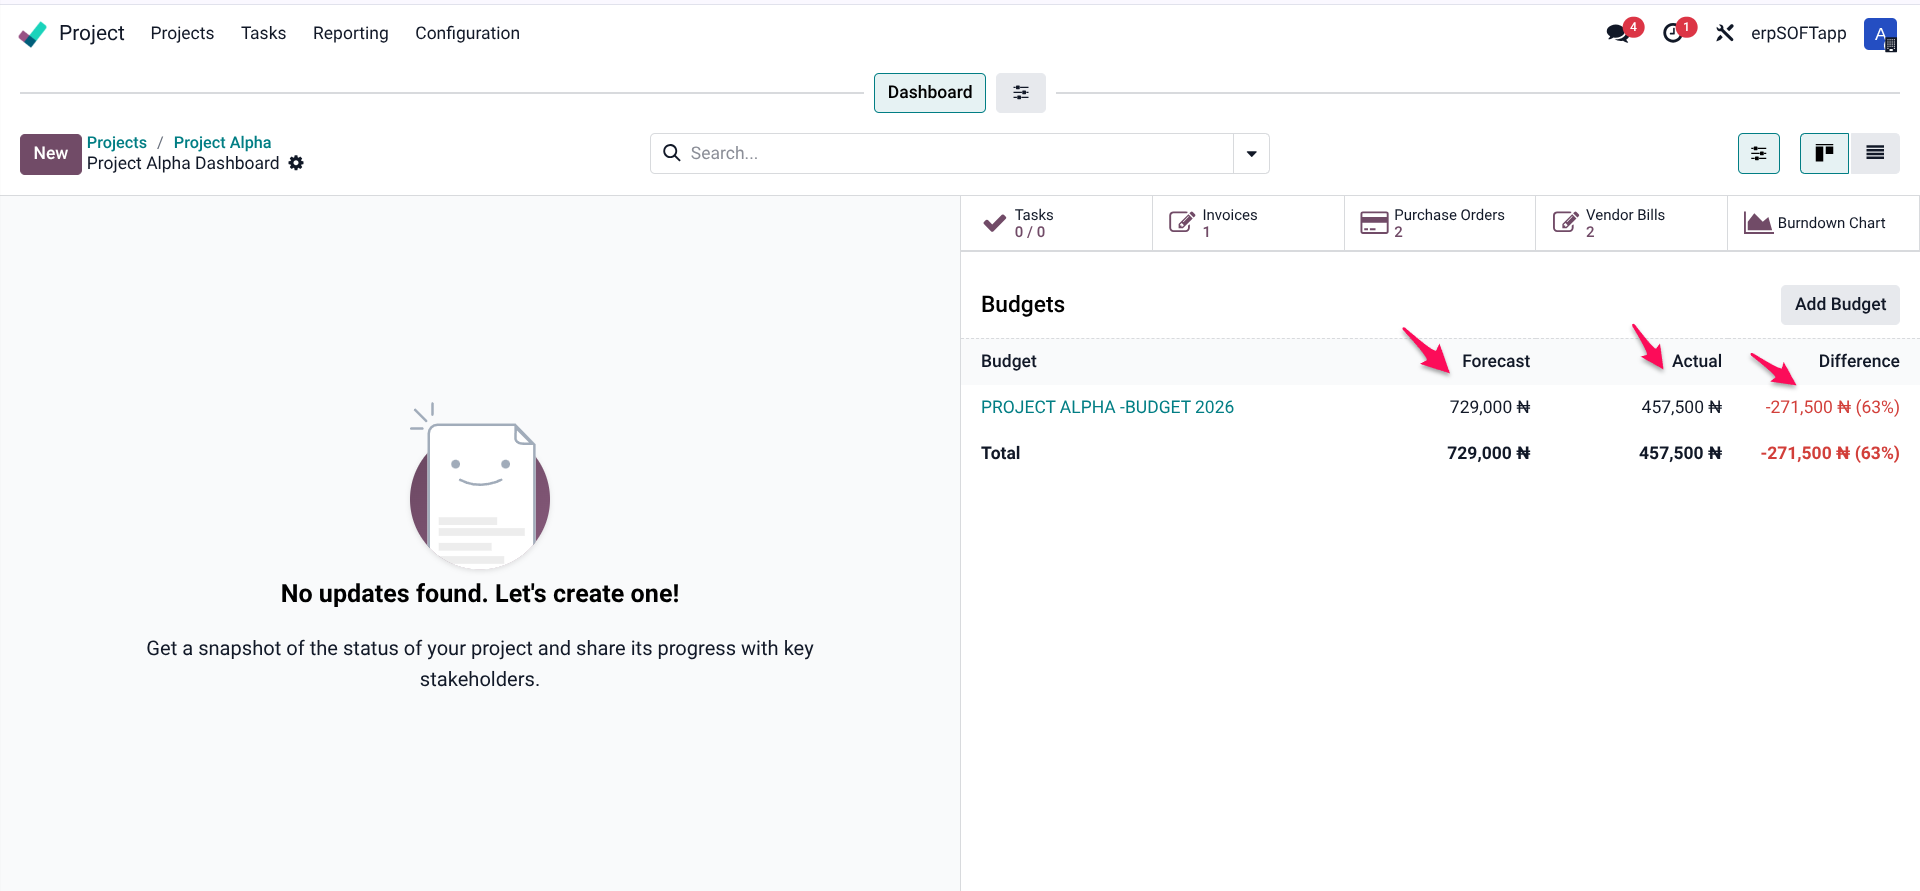
Budget Alerts and Visual Indicators
Odoo 19 provides visual cues to flag potential budget overruns before they become crises.
Purchase Order Warning: If a user creates a Purchase Order that, when combined with existing Achieved and Committed amounts, would exceed the Budgeted amount for its linked analytic account, Odoo highlights the line in red.
This red highlight is a clear, immediate signal to the purchasing team or project manager: "This order will put us over budget. Approve with caution or request additional funding."
While Odoo does not automatically block over-budget purchase orders (by default), the visual warning forces deliberate decision-making rather than accidental overruns.
Budget Exceeded Indicator: On the main Analytic Budget view, budgets that have exceeded their limits often display visual indicators—colored text, warning icons, or negative remaining amounts—depending on your Odoo version and theme configuration.
Beyond the Basics: Advanced Monitoring Techniques
Once you have mastered basic budget tracking, consider these advanced techniques for even greater control.
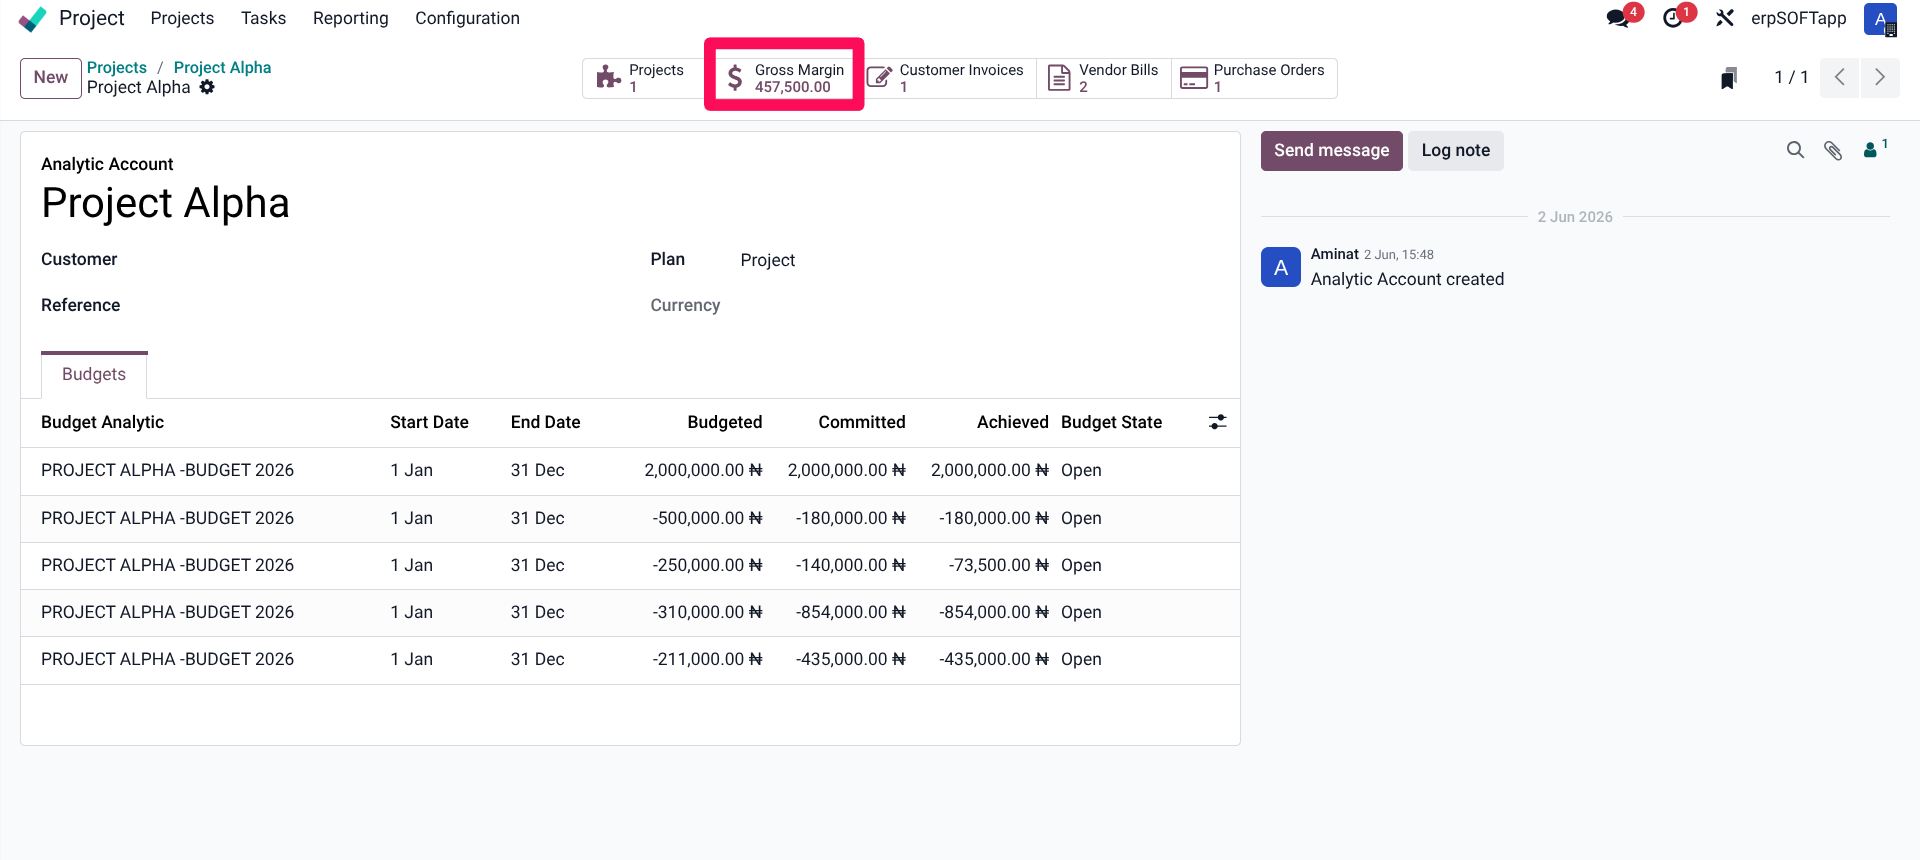
1. The Project Profitability Dashboard
While the Analytic Budget view focuses only on expenses against a budget, the Project Profitability dashboard provides a complete picture, including revenues, costs, and margins.
Navigation Path: Project → Reporting → Project Profitability
This dashboard shows, for each project:
- Total revenue (invoiced amounts linked to the project)
- Total costs (expenses, timesheets, materials linked to the project)
- Gross margin (revenue minus costs)
- Margin percentage
When used alongside Analytic Budgets, you can track both absolute spending (against budget) and profitability (revenue minus costs).
2. Multi-Period Budgeting
For long-term projects spanning multiple fiscal periods, create separate budgets for each period rather than one annual budget.
Example: A 9-month project might have:
- Budget 1: Q1 (Months 1-3) – $100,000
- Budget 2: Q2 (Months 4-6) – $150,000
- Budget 3: Q3 (Months 7-9) – $75,000
This approach provides more granular tracking and prevents one quarter's overrun from obscuring performance in others.
3. Alert-Based Email Notifications
While Odoo 19 does not include native out-of-the-box email alerts for budget thresholds, you can configure automated actions or use Odoo Studio to trigger notifications when Committed amounts exceed a certain percentage of Budgeted (e.g., send an email to the project manager when 80% of the budget is committed).
This requires some technical configuration but is achievable within Odoo's automation framework.
4. Cross-Project Reporting
Use Odoo's reporting engine to compare budget performance across multiple projects simultaneously. This is particularly valuable for portfolio managers overseeing several concurrent initiatives.
Create a custom pivot view in the Analytic Budgets model, grouping by:
- Project Manager
- Client
- Project Type
- Department
This reveals which categories of projects consistently overrun budgets—pointing to systemic issues like inaccurate estimating or scope creep.
Common Pitfalls and How to Avoid Them
Even with robust tools, mistakes happen. Here are the most common issues Odoo users encounter with real-time expense tracking, and how to avoid them.
Pitfall 1: Forgetting to Link Expenses to Analytic Accounts
The Problem: A vendor bill or expense report is processed, but the Analytic Account field is left blank. The expense is recorded in the general ledger but never appears in the project budget.
The Solution: Make the Analytic Account field mandatory on all relevant transaction types. This can be configured in Odoo's accounting settings or through automated workflow rules.
Pitfall 2: Using the Wrong Analytic Account
The Problem: An expense is linked to "Project Alpha" when it truly belongs to "Project Beta." Budget reports become inaccurate for both projects.
The Solution: Implement a secondary approval step for larger expenses, where a project manager verifies the correct account before the transaction is finalised. Also, use clear, descriptive analytic account names to reduce confusion.
Pitfall 3: Leaving Budgets in Draft Status
The Problem: A budget is created with lines and amounts, but the user forgets to click Open. The budget appears in lists but never tracks actual expenses against it.
The Solution: Create a checklist for project setup that includes "Validate Budget Status = Open" as a mandatory step before project work begins.
Pitfall 4: Misunderstanding Committed vs. Achieved
The Problem: A project manager sees Achieved = $30,000 and Budgeted = $50,000, assuming $20,000 remains. But Committed (including open POs) is actually $48,000. The team continues spending as if they have plenty of room, quickly exceeding the budget.
The Solution: Train all project stakeholders to watch the Committed column, not just Achieved. The Committed amount is the truest reflection of remaining financial capacity.
Pitfall 5: Not Updating Budgets When Scope Changes
The Problem: A client approves a $10,000 scope expansion, but the budget in Odoo is never updated. Subsequent tracking shows a budget overrun that isn't actually a problem, creating unnecessary alarms.
The Solution: Establish a formal change order process that includes updating the relevant Analytic Budget in Odoo before any new scope work begins. Use the budget's editing capabilities (closing, modifying, and reopening) to reflect approved changes.
Integration With Other Odoo Modules
Real-time expense tracking does not operate in isolation. Odoo 19's strength is its unified architecture, and project budget tracking benefits from integration across modules.
Module | Integration Point | Value Added |
Project | Timesheets, task materials, milestone billing | Automatically captures labor costs and task-related expenses against budgets |
Purchase | Purchase orders, vendor bills, receipts. | Tracks committed costs from the moment a PO is confirmed |
Expenses | Employee expense reports | Captures travel, supplies, and miscellaneous project costs |
Accounting | Journal entries, vendor bills, payments | Provides the source of truth for Achieved amounts |
Sales | Quotes, sales orders, invoices | Tracks project revenue alongside expenses for profitability views |
Inventory | Stock moves, delivery orders | Captures material costs consumed by projects |
The true power of Odoo 19's real-time expense tracking emerges when all these modules work together, with each transaction automatically flowing into project budget views without manual intervention.
Conclusion: Moving From Reactive to Proactive Budget Management
Traditional budget management is reactive. You spend, you record, you reconcile, and weeks later, you discover you have a problem. By then, the spending has already happened, and your options are limited.
Odoo 19's real-time expense tracking transforms budget management into a proactive discipline. When you can see Committed amounts climbing toward Budgeted limits as they happen, you have options:
- Renegotiate vendor pricing before signing purchase orders
- Reallocate resources from lower-priority activities
- Alert clients to potential overages before they become surprises
- Approve or reject new spending based on current reality, not last month's report
The configuration effort is minimal—enable a few settings, create analytic accounts, set up budgets. The payoff is substantial: fewer budget overruns, more profitable projects, and a finance team that stops fighting fires and starts enabling strategy.
For project managers tired of discovering problems too late, Odoo 19's real-time expense tracking isn't just a feature. It's a competitive advantage.
Work With Us
Ready to implement real-time project expense tracking for your organization? At erpSOFTapp, we specialise in helping businesses configure, customise, and optimise Odoo solutions that deliver measurable operational improvements.
Our team can help you:
- Set up analytic accounting and budget tracking tailored to your project types
- Train your staff on best practices for expense tagging
- Build custom dashboards and alerts for proactive budget management
- Integrate project tracking with your existing financial workflows
Contact us today to discuss how Odoo 19 can transform your project budget management from reactive to real-time.